How To
How To Create an Account
Note , this operation is not supported anymore. If you’re uncertain about the account, please consult with your teammates. If this is a completely new project, feel free to submit a request to create a new account in support channel.
To create a new account, simply do the following:
$ eai account new acme.awesome_project
Note that once created, you can also create child accounts:
$ eai account new acme.awesome_project.production
To list the child accounts:
$ eai account ls acme.awesome_project
id                                   name       organization parent
00d0c0c0-0b00-0fae-0000-d00beabf000a production acme         acme.awesome_project
How To Setup Multi-factor authentication (MFA)
Install Authenticator App

If you have already installed Authenticator app from Google, you can skip this step.
If not, download this app from Google Play Store for Android or App Store for Apple iOS devices.
Existing User / New User
If you are an existing user and if you are logged in through Web, logout (https://console.elementai.com/logout or click your initials on the top right and click logout). Close the browser.
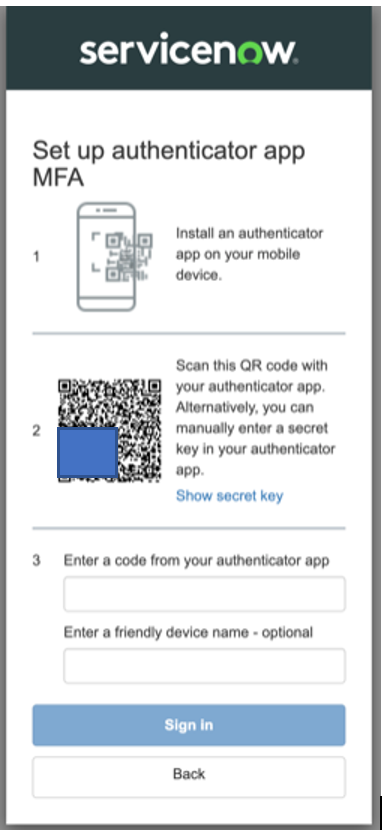
If you have logged in through CLI, close the terminal window. Login through web again. You will see the MFA Prompt like the screenshot below.
If you are a new user, after you complete your email verification, you will see the MFA prompt like the screenshot below.
Copy and Store the Secret Key
Warning
Do NOT scan the QR code or enter the key now. First, copy the secret key and store it in a safe and secure place. If you lose your device or replace your device with a new one or delete the Authenticator app, you can use this key to recover your account without any issues. Otherwise, you must set up a new user again.
Scan the QR Code / Enter Secret Key After storing the secret key, you can scan the QR code or enter the secret key in your authenticator app.
Enter the OTP Code Now, your authenticator app will generate a six-digit OTP code under “auth.console.elementai.com:xxxxx…”. Enter that code in the MFA Prompt screen. You can also enter a friendly name, say “AI Toolkit”. This is optional.
MFA Setup is complete.
Using MFA for login
After the one-time MFA setup is done, every time you login to AI Toolkit on Web, you will be prompted to enter the OTP code like the screenshot below, after the credentials are entered.
Open the Authenticator app on your device, note the code for AI Toolkit, enter that code and click ‘Sign in’.
For using CLI, follow the same process as you are doing currently: It will provide an URL. Copy and paste the URL in a browser. The login web page will be displayed. Enter your credentials, and then the OTP code.

How To Delete Directories in a Data?
Although toolkit does not let you delete data objects ( see Can I delete an account, a data or a job?), you can delete its contents.
You can clear the contents of a data object using the cli, as shown below:
# List the contents
eai data content ls snow.some_account.some_data
    name                                           status
    .DS_Store                                      new
    AAA                                            new
    AAA/Accelerometer Data 2019-06-28 14-00-01.txt new
    AAA/Accelerometer Data 2019-06-28 14-37-42.txt new
    BBB                                            new
    BBB/.DS_Store                                  new
    BBB/BBB-1                                      new
    BBB/BBB-1/.DS_Store                            new
    ...

# You can selectively delete a directory inside it
eai data content rm snow.some_account.some_data AAA

# You can see directory AAA is now deleted
eai data content ls snow.some_account.some_data
    name                     status
    .DS_Store                new
    BBB                      new
    BBB/.DS_Store            new

# You can also clear out its contents entirely
eai data content rm snow.some_account.some_data .

# If you try to list the contents now, the data object will be empty
eai data content ls snow.some_account.some_data
Or you can mount the data object in a job, and run code inside the job to delete the contents of that data object, as shown below:
# Mount the data while submitting the job
eai job submit --data dataID:/data -- sleep 720

# Now you can execute commands to delete the contents of the data object from inside the job
# Here <expr_id> can be `*` or `some_folder` or `some_folder/inner_folder` or `some_folder/some_file` etc.
eai job exec jobID -- bash -c 'rm -rf /data/<exp_id>'
How to Develop in a running job
or how to use VSCode to edit code efficiently in the environment of a running job and benefit from:
low file edition latency
full functionality of VSCode’s built-in Git extension
full functionality of other VSCode extensions _eg._ Python (linting, autocompletion, etc.)
For this purpose, we suggest to connect your local VSCode to a running job via SSH, using the Remote - SSH extension.
Create your home directory
Create your home directory as a blob in eai data (if not done already):
HOME_DATA_NAME="acme.joe.home"
eai data new $HOME_DATA_NAME
Specify your job
We suggest to serve a Jupyter Notebook from an interactive job. While it is running, we can connect to it with VSCode.
Image build and push
Create your Dockerfile:
# you may use another image
FROM jupyter/base-notebook:python-3.7.6

# to put at the end, to enable ssh and port forwarding
USER root
EXPOSE 2222
EXPOSE 6000
EXPOSE 8088
ENV LANG=en_US.UTF-8
RUN apt update && \
    apt install -y \
        ca-certificates supervisor openssh-server bash ssh \
        curl wget vim procps htop locales nano man net-tools iputils-ping && \
    sed -i "s/# en_US.UTF-8/en_US.UTF-8/" /etc/locale.gen && \
    locale-gen && \
    useradd -m -u 13011 -s /bin/bash toolkit && \
    passwd -d -x 99999 toolkit && \
    useradd -m -u 13011 -s /bin/bash --non-unique console && \
    passwd -d -x 99999 console && \
    useradd -m -u 13011 -s /bin/bash --non-unique _toolchain && \
    passwd -d -x 99999 _toolchain && \
    useradd -m -u 13011 -s /bin/bash --non-unique coder && \
    passwd -d -x 99999 coder && \
    chown -R toolkit:toolkit /run /etc/shadow /etc/profile && \
    apt autoremove --purge && apt-get clean && \
    rm -rf /var/lib/apt/lists/* /tmp/* /var/tmp/* && \
    echo ssh >> /etc/securetty && \
    rm -f /etc/legal /etc/motd
COPY --chown=13011:13011 --from=registry.console.elementai.com/shared.image/sshd:base /tk /tk
RUN chmod 0600 /tk/etc/ssh/ssh_host_rsa_key
ENTRYPOINT ["/tk/bin/start.sh"]
Build and push it
$ export IMAGE=registry.console.elementai.com/acme.joe/jupyter
$ docker build -t $IMAGE .
$ docker push $IMAGE
Job configuration file
Edit a job configuration file, _eg._ job.yml:
image: registry.console.elementai.com/acme.joe/jupyter

data:
    - acme.joe.home:/home/toolkit

interactive: true

command:
- /tk/bin/start.sh
- /bin/bash
- -c
- jupyter notebook --ip=0.0.0.0 --port=8080 --no-browser --NotebookApp.token='' --NotebookApp.custom_display_url=https://${EAI_JOB_ID}.job.console.elementai.com --NotebookApp.disable_check_xsrf=True --NotebookApp.allow_origin='*'
Note: Files added Dockerfile in /home/toolkit will be overwrite by data from acme.joe.home*
Submit job
$ eai job submit -f job.yml
Warning
This feature is not secured if used on shared computer such as a server with multiple ssh user logged in. Everybody
on the machine can access the job without authentication once you launch the eai job port-forward command.
Forward port
$ eai job port-forward --last 2222
From here you can ssh as user toolkit (default on all jobs) to your running job via a tunnel on localhost
(you do not need to use flag -A to forward your Github SSH credentials, eai job port-forward does it for you already):
$ ssh -p 2222 toolkit@localhost
Connect VSCode
On your local machine, edit ~/.ssh/config and append:
Host localhost
    ForwardAgent yes
    Port 2222
    User toolkit
In VSCode, Command Palette <Shift+{Ctrl,Cmd}+P> -> “Remote-SSH: Connect to Host” -> “localhost”.
From here, you can
git cloneyour project repoInstall VSCode extensions on the host (note these extensions are installed in your
/home/toolkit -> acme.joe.home, so you do not have to reinstall them at every new job you connect to)Use VSCode Git Extension
How to run a python server in toolkit
Use a Python framework like FastAPI, Django or Flask to write a small API that does what you want
Build a Docker image that expects to have the model data mounted and that runs the API. Example docker image can be found here
Submit a Toolkit job in the account, with the image and the model data mounted. If you want a long running server (more than 48hrs), use restartable with high bid.
Create a new role, policy and a key (token)
# create a new role
$ eai role new account_fullname.job_access

# attach a policy which gives access to the python server
$ eai role policy new account_fullname.job_access "job:get@"$(eai job get --field urn JOB_ID)

# create a long lived token to access the python server
$ eai role key new account_fullname.job_access
Use the token to call the API from anywhere (you can find the job’s accessUrl with the eai job info command)
How To Manage Access
The EAI toolkit provides an API to manage access to resources. In addition to their ID, each resource is assigned an explicit URN that indicates its type and ownership. For example, a user is a kind of resource owned by an organization. Assuming you are already logged in, you can get the URN of your user with this:
$ eai user get --field urn
491e3474-8382-4437-a68b-18414701dec3:user:3c0e93a5-4174-4487-bbaa-59138ba24833
Here:
491e3474-8382-4437-a68b-18414701dec2is the organization and3c0e93a5-4174-4487-bbaa-59138ba24833is the user.
URNs are useful to express access rules.
An access rule simply defines actions allowed on a URN expression.
Using the wildcard * character, a rule can refers to a set of resources.
For example:
491e3474-8382-4437-a68b-18414701dec2refers to the organization491e3474-8382-4437-a68b-18414701dec2:*refers to all resources of the organization491e3474-8382-4437-a68b-18414701dec2:user:*refers to all users of the organization
Each client access is validated against a set of access rules. You can list your access rules:
$ eai rule ls
action   expression
user:set 491e3474-8382-4437-a68b-18414701dec2:user:3c0e93a5-4174-4487-bbaa-59138ba24833
*:get    491e3474-8382-4437-a68b-18414701dec2
*:get    491e3474-8382-4437-a68b-18414701dec2:user:*
*:get    491e3474-8382-4437-a68b-18414701dec2:team:*
*        491e3474-8382-4437-a68b-18414701dec2:account:a5b807de-78b1-4e3b-b301-839cf0c976f3
*        491e3474-8382-4437-a68b-18414701dec2:account:a5b807de-78b1-4e3b-b301-839cf0c976f3:*
Let’s go over those.
The first rule explicitly allows the user:set action on yourself.
This action correspond to updating user details:
$ eai user set --name joe
The next 3 rules are inherited from the user role attached to your organization.
When your user was created, it was authorized to assume the user role for your organization.
This enables you to get details about your organization, its users and its teams.
This correspond to a number of commands:
$ eai organization get
$ eai user ls
$ eai team ls
Policies
Access rules are stored in policies.
A policy is set of rules composed with statements that allow actions on resources, using syntax <action>[+<action>...]@<resource>[+<resource>...].
It can be attached to clients of the API i.e. users, teams and roles.
For example, this explicitely gives root access to the cluster to a single user:
$ eai user policy new 3c0e93a5-4174-4487-bbaa-59138ba24833 '*@*'
Users inherit policies from:
policies attached to them
policies attached to a team they are a member of directly or indirectly
policies attached to a role they can assume
Thus, there is 3 ways to create policies:
$ eai user policy new
$ eai team policy new
$ eai role policy new
Note that adding policies to a user, a team or a role requires access to that resource.
Roles
While it is possible to manage access with policies attached directly to users and teams, the most common way is to use roles. If a user or a team is allowed to assume a role, it inherits the role’s policies. There are a number of roles that are predefined. Since they can be attached to organizations, teams and accounts, they can be listed using:
$ eai organization role ls
$ eai team role ls
$ eai account role ls
For example:
$ eai organization role ls --fields id,name
id                                   name
c53444c6-206e-4ae7-bab7-baacdab5a0a7 admin
e11bb1f4-b85a-4734-a5a4-f52cadd50ca6 user
To assume a role, a user or a team needs to be a member of that role. Thus, the following can be used to list members:
$ eai organization role member ls c53444c6-206e-4ae7-bab7-baacdab5a0a7
id                                   name      type
80db146b-1c79-4ed0-bb8b-db1698fddd58 jerome    user
94731f2a-aa48-443a-b013-c00ea9507d0f guillaume user
0eb96759-aef0-4acc-91a7-202cac71c472 eric      user
Simply use the add or rm commands to manager members:
$ eai organization role member rm c53444c6-206e-4ae7-bab7-baacdab5a0a7 --user 94731f2a-aa48-443a-b013-c00ea9507d0f
id                                   name      type
80db146b-1c79-4ed0-bb8b-db1698fddd58 jerome    user
0eb96759-aef0-4acc-91a7-202cac71c472 eric      user
$ eai organization role member add c53444c6-206e-4ae7-bab7-baacdab5a0a7 --user 94731f2a-aa48-443a-b013-c00ea9507d0f
id                                   name      type
80db146b-1c79-4ed0-bb8b-db1698fddd58 jerome    user
94731f2a-aa48-443a-b013-c00ea9507d0f guillaume user
0eb96759-aef0-4acc-91a7-202cac71c472 eric      user
How to Monitor a Job Resources Usage
Resources usage can be consulted in Grafana. Simply put your job id in the following URL template.
https://graphs.console.elementai.com/d/000000812/job-usage-metrics-using-accelerator?from=now-30m&&to=now&var-job_id=<JOB-ID>
This will show the usage of the job over the last 30 minutes. To change that time window, use the top right menu option.
Warning
The only for users to view job resource usages is through Grafana. The API endpoints job_usage are poorly named and yield resource occupation instead of usage.
How to Prevent Output Buffering
By default, stdout is buffered. To change that behaviour you can use stdbuf.
eai job submit -- stdbuf -oL '{COMMAND}'
How to Pull Certain Files
See examples in eai data pull --help
eai data pull acme.account.data ./remote .
How to Redirect stdout and stderr to a File
The following command redirects both stdout and stderr to a single file named with the job id.
eai job submit -- bash -c '{COMMAND} > /home/{USERNAME}/${EAI_JOB_ID}.txt 2>&1'
If you want to keep output from all the runs of a preemptable job, you might want to append to the same log file …
eai job submit -- bash -c '{COMMAND} >> /home/{USERNAME}/${EAI_JOB_ID}.txt 2>&1'
… or use the EAI_RUN_INDEX to have one log file per run.
eai job submit -- bash -c '{COMMAND} > /home/{USERNAME}/${EAI_JOB_ID}.${EAI_RUN_INDEX}.txt 2>&1'
How to Run a “shell” Image
# launching a job that will stick around
eai job submit -- bash -c 'while true; do sleep 60; done;'

# start an interactive pseudo terminal into it
eai job exec --last -- bash
How To Run Pycharm
When using Pycharm Professional Edition, it is possible to use a remote environment. To do so, we only need to establish an SSH connection from Toolkit to your machine.
Dockerfile
First, let’s build a Docker image with an SSH Daemon, you will have to modify this to include any dependencies you want.
FROM continuumio/miniconda3

# TODO Here, install your dependencies for example, Pytorch and jupyter.
WORKDIR /app
RUN conda install python=3.6.9
RUN conda update pip -y \
    && conda install poetry -y \
    && conda install wrapt==1.12.1 llvmlite==0.31.0 pyyaml==5.3 notebook --channel conda-forge -y \
    && conda install pytorch torchvision -c pytorch


# SSH server related changes
# TODO exposed ports, need to fix
EXPOSE 2222
EXPOSE 6000
EXPOSE 8088
ENV LANG=en_US.UTF-8
RUN apt update && \
    apt install -y \
        ca-certificates supervisor openssh-server bash ssh \
        curl wget vim procps htop locales nano man net-tools iputils-ping && \
    sed -i "s/# en_US.UTF-8/en_US.UTF-8/" /etc/locale.gen && \
    locale-gen && \
    useradd -m -u 13011 -s /bin/bash toolkit && \
    passwd -d -x 99999 toolkit && \
    useradd -m -u 13011 -s /bin/bash --non-unique console && \
    passwd -d -x 99999 console && \
    useradd -m -u 13011 -s /bin/bash --non-unique _toolchain && \
    passwd -d -x 99999 _toolchain && \
    useradd -m -u 13011 -s /bin/bash --non-unique coder && \
    passwd -d -x 99999 coder && \
    chown -R toolkit:toolkit /run /etc/shadow /etc/profile && \
    apt autoremove --purge && apt-get clean && \
    rm -rf /var/lib/apt/lists/* /tmp/* /var/tmp/* && \
    echo ssh >> /etc/securetty && \
    rm -f /etc/legal /etc/motd
COPY --chown=13011:13011 --from=registry.console.elementai.com/shared.image/sshd:base /tk /tk
RUN chmod 0600 /tk/etc/ssh/ssh_host_rsa_key
ENTRYPOINT ["/tk/bin/start.sh"]
You can build the image with:
$ export IMAGE=registry.console.elementai.com/org.acme/python_env
$ docker build -t $IMAGE .
$ docker push $IMAGE
Job launching
First, edit your ~/.ssh/config and add :
Host localhost
ForwardAgent yes
Port 2222
User toolkit
We can now launch a job. We will also launch a Jupyter server in case you need it.
Feel free to modify the resources according to your needs.
In a file named remote-env.yml add the following:
image: registry.console.elementai.com/org.acme/python_env
interactive: true
command:
  - /tk/bin/start.sh
  - /bin/bash
  - -c
  - jupyter notebook --ip=0.0.0.0 --port=8080 --no-browser --NotebookApp.token='' --NotebookApp.custom_display_url=https://${EAI_JOB_ID}.job.console.elementai.com --NotebookApp.disable_check_xsrf=True --NotebookApp.allow_origin='*'

resources:
  cpu: 4
  mem: 8
  gpu: 0
Launch the job with: eai job submit -f remote-env.yml and verify that there are no errors in the logs.
Importing the environment in Pycharm
Once the job is running, we will want to create a connection between your computer and the job with:
eai job port-forward --last 2222
In Pycharm for Linux, go to File/Settings/Projects/Python Environment/ Add … / SSH Interpreter. Fill the fields as follow and click Next.
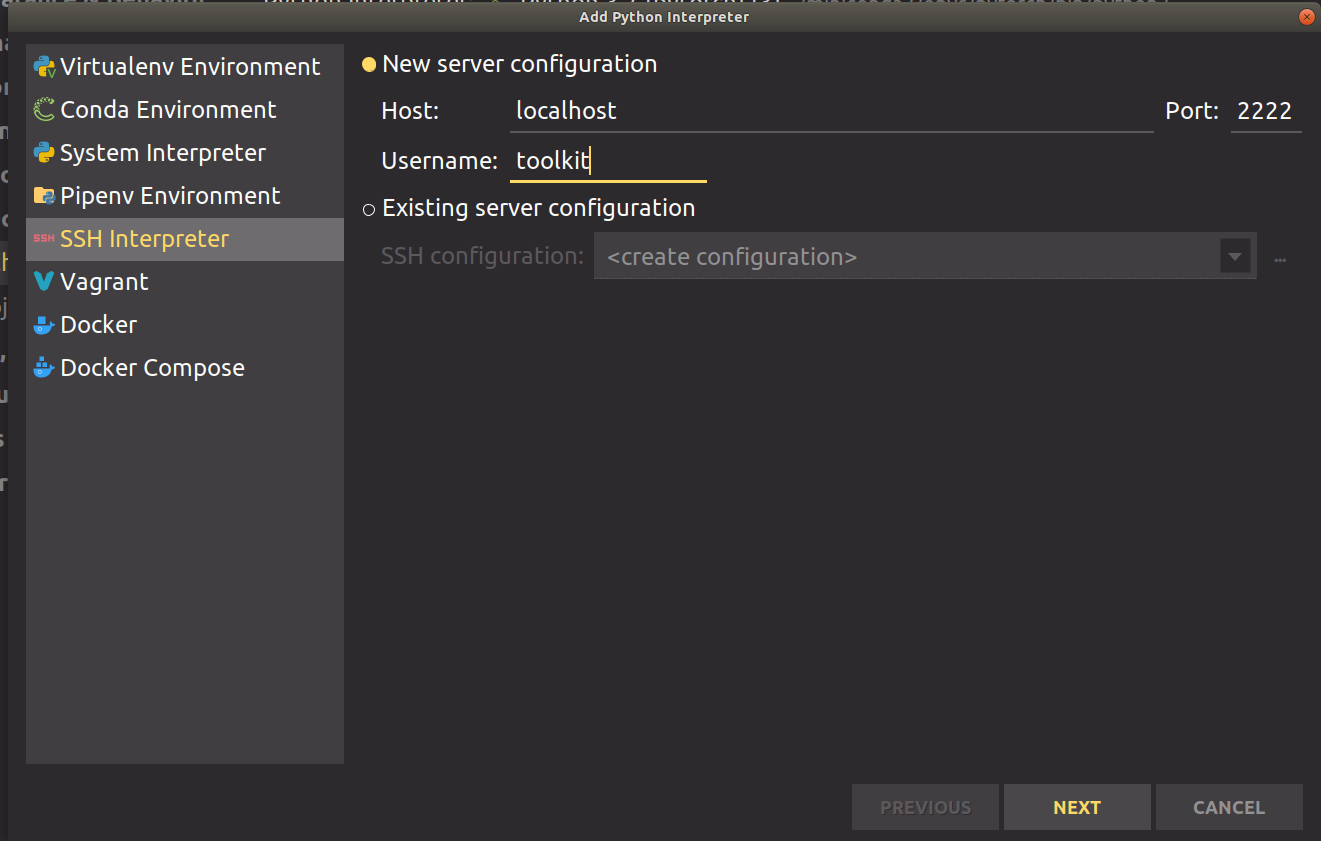
Change the location of the interpreter according to your environment. For example, Conda is at /opt/conda/bin/python.
Click Finish.
You’re all set! We can now run a script from Pycharm hello-world.py that will run in the job.
import os

print("Working dir: ", os.getcwd())
# We can import pytorch now!
import torch

print('Torch random', torch.ones([1, 3, 3]).shape)
print("Torch lib location", torch.__file__)
Running this script will output:
ssh://toolkit@localhost:2222/opt/conda/bin/python -u /tmp/pycharm_project_480/hello-world.py
Working dir:  /tmp/pycharm_project_480
Torch random torch.Size([1, 3, 3])
You can also set breakpoints and inspect variables.
On the right panel, you should see files getting synced:

How To Run VisualStudio Code
The following commands are performed by the acme.joe user.
First, let’s create a data to hold vscode settings:
$ eai data new vscode
Then, assuming you want to edit code that lives in acme.job.sample data, simply submit a job with the following:
$ eai job submit --image codercom/code-server:v2 \
    --data acme.joe.vscode:/home/coder/.local/share/code-server \
    --data acme.job.sample:/home/coder/project \
    code-server -- --host 0.0.0.0 --auth none
id                                   state   name created              command                                  runs.exitCode
5c5bce9b-4657-4836-89d9-01ec780f57db QUEUING      2019-12-06T20:49:41Z [code-server --host 0.0.0.0 --auth none] -
$ eai job logs -f
info  Server listening on http://0.0.0.0:8080
info    - No authentication
info    - Not serving HTTPS
Once running, use the job ID to connect yourself to the web interface using your browser. For example:
How to tell who has specific rights over a resource?
eai rule who-is-allowed <action>@<resource urn>
Who can write to a specific data object:
eai rule who-is-allowed "data:set@$(eai data get <data id> --field urn)"
How to tell if you have specific rights over a resource?
eai rule allowed <action>@<resource urn>
Whether you can write to a specific data object:
eai rule allowed "data:set@$(eai data get <data id> --field urn)"