How to develop in a Toolkit job
With VSCode
or how to use VSCode to edit code efficiently in the environment of a running job and benefit from:
low file edition latency
full functionality of VSCode’s built-in Git extension
full functionality of other VSCode extensions _eg._ Python (linting, autocompletion, etc.)
For this purpose, we suggest to connect your local VSCode to a running job via SSH, using the Remote - SSH extension.
Specify your job specification
We suggest to serve a Jupyter Notebook from an interactive job. While it is running, we can connect to it with VSCode.
Image build and push
Create your Dockerfile:
# you may use another image
FROM jupyter/base-notebook:python-3.7.6

# to put at the end, to enable ssh and port forwarding
USER root
EXPOSE 2222
EXPOSE 6000
EXPOSE 8088
ENV LANG=en_US.UTF-8
RUN apt update && \
    apt install -y \
        ca-certificates supervisor openssh-server bash ssh \
        curl wget vim procps htop locales nano man net-tools iputils-ping && \
    sed -i "s/# en_US.UTF-8/en_US.UTF-8/" /etc/locale.gen && \
    locale-gen && \
    useradd -m -u 13011 -s /bin/bash toolkit && \
    passwd -d -x 99999 toolkit && \
    useradd -m -u 13011 -s /bin/bash --non-unique console && \
    passwd -d -x 99999 console && \
    useradd -m -u 13011 -s /bin/bash --non-unique _toolchain && \
    passwd -d -x 99999 _toolchain && \
    useradd -m -u 13011 -s /bin/bash --non-unique coder && \
    passwd -d -x 99999 coder && \
    chown -R toolkit:toolkit /run /etc/shadow /etc/profile && \
    apt autoremove --purge && apt-get clean && \
    rm -rf /var/lib/apt/lists/* /tmp/* /var/tmp/* && \
    echo ssh >> /etc/securetty && \
    rm -f /etc/legal /etc/motd
COPY --chown=13011:13011 --from=registry.console.elementai.com/shared.image/sshd:base /tk /tk
RUN chmod 0600 /tk/etc/ssh/ssh_host_rsa_key
ENTRYPOINT ["/tk/bin/start.sh"]
Build and push it
$ export IMAGE=registry.console.elementai.com/acme.joe/jupyter
$ docker build -t $IMAGE .
$ docker push $IMAGE
Job configuration file
Edit a job configuration file, _eg._ job.yml:
image: registry.console.elementai.com/acme.joe/jupyter

data:
    - acme.home.joe:/home/toolkit

interactive: true

command:
- /tk/bin/start.sh
- /bin/bash
- -c
- jupyter notebook --ip=0.0.0.0 --port=8080 --no-browser --NotebookApp.token='' --NotebookApp.custom_display_url=https://${EAI_JOB_ID}.job.console.elementai.com --NotebookApp.disable_check_xsrf=True --NotebookApp.allow_origin='*'
Note: Files added Dockerfile in /home/toolkit will be overwrite by data from acme.home.joe*
Submit job
$ eai job submit -f job.yml
Warning
This feature is not secured if used on shared computer such as a server with multiple ssh user logged in. Everybody
on the machine can access the job without authentication once you launch the eai job port-forward command.
Forward port
$ eai job port-forward --last 2222
From here you can ssh as user toolkit (default on all jobs) to your running job via a tunnel on localhost
(you do not need to use flag -A to forward your Github SSH credentials, eai job port-forward does it for you already):
$ ssh -p 2222 toolkit@localhost
Connect VSCode
On your local machine, edit ~/.ssh/config and append:
Host localhost
    ForwardAgent yes
    Port 2222
    User toolkit
In VSCode, Command Palette <Shift+{Ctrl,Cmd}+P> -> “Remote-SSH: Connect to Host” -> “localhost”.
From here, you can
git cloneyour project repoInstall VSCode extensions on the host (note these extensions are installed in your
/home/toolkit -> acme.joe.home, so you do not have to reinstall them at every new job you connect to)Use VSCode Git Extension
With Pycharm
When using Pycharm Professional Edition, it is possible to use a remote environment. To do so, we only need to establish an SSH connection from Toolkit to your machine.
Dockerfile
First, let’s build a Docker image with an SSH Daemon, you will have to modify this to include any dependencies you want.
FROM continuumio/miniconda3

# TODO Here, install your dependencies for example, Pytorch and jupyter.
WORKDIR /app
RUN conda install python=3.6.9
RUN conda update pip -y \
    && conda install poetry -y \
    && conda install wrapt==1.12.1 llvmlite==0.31.0 pyyaml==5.3 notebook --channel conda-forge -y \
    && conda install pytorch torchvision -c pytorch


# SSH server related changes
# TODO exposed ports, need to fix
EXPOSE 2222
EXPOSE 6000
EXPOSE 8088
ENV LANG=en_US.UTF-8
RUN apt update && \
    apt install -y \
        ca-certificates supervisor openssh-server bash ssh \
        curl wget vim procps htop locales nano man net-tools iputils-ping && \
    sed -i "s/# en_US.UTF-8/en_US.UTF-8/" /etc/locale.gen && \
    locale-gen && \
    useradd -m -u 13011 -s /bin/bash toolkit && \
    passwd -d -x 99999 toolkit && \
    useradd -m -u 13011 -s /bin/bash --non-unique console && \
    passwd -d -x 99999 console && \
    useradd -m -u 13011 -s /bin/bash --non-unique _toolchain && \
    passwd -d -x 99999 _toolchain && \
    useradd -m -u 13011 -s /bin/bash --non-unique coder && \
    passwd -d -x 99999 coder && \
    chown -R toolkit:toolkit /run /etc/shadow /etc/profile && \
    apt autoremove --purge && apt-get clean && \
    rm -rf /var/lib/apt/lists/* /tmp/* /var/tmp/* && \
    echo ssh >> /etc/securetty && \
    rm -f /etc/legal /etc/motd
COPY --chown=13011:13011 --from=registry.console.elementai.com/shared.image/sshd:base /tk /tk
RUN chmod 0600 /tk/etc/ssh/ssh_host_rsa_key
ENTRYPOINT ["/tk/bin/start.sh"]
You can build the image with:
$ export IMAGE=registry.console.elementai.com/org.acme/python_env
$ docker build -t $IMAGE .
$ docker push $IMAGE
Job launching
First, edit your ~/.ssh/config and add :
Host localhost
ForwardAgent yes
Port 2222
User toolkit
We can now launch a job. We will also launch a Jupyter server in case you need it.
Feel free to modify the resources according to your needs.
In a file named remote-env.yml add the following:
image: registry.console.elementai.com/org.acme/python_env
interactive: true
command:
  - /tk/bin/start.sh
  - /bin/bash
  - -c
  - jupyter notebook --ip=0.0.0.0 --port=8080 --no-browser --NotebookApp.token='' --NotebookApp.custom_display_url=https://${EAI_JOB_ID}.job.console.elementai.com --NotebookApp.disable_check_xsrf=True --NotebookApp.allow_origin='*'

resources:
  cpu: 4
  mem: 8
  gpu: 0
Launch the job with: eai job submit -f remote-env.yml and verify that there are no errors in the logs.
Importing the environment in Pycharm
Once the job is running, we will want to create a connection between your computer and the job with:
eai job port-forward --last 2222
In Pycharm for Linux, go to File/Settings/Projects/Python Environment/ Add … / SSH Interpreter. Fill the fields as follow and click Next.
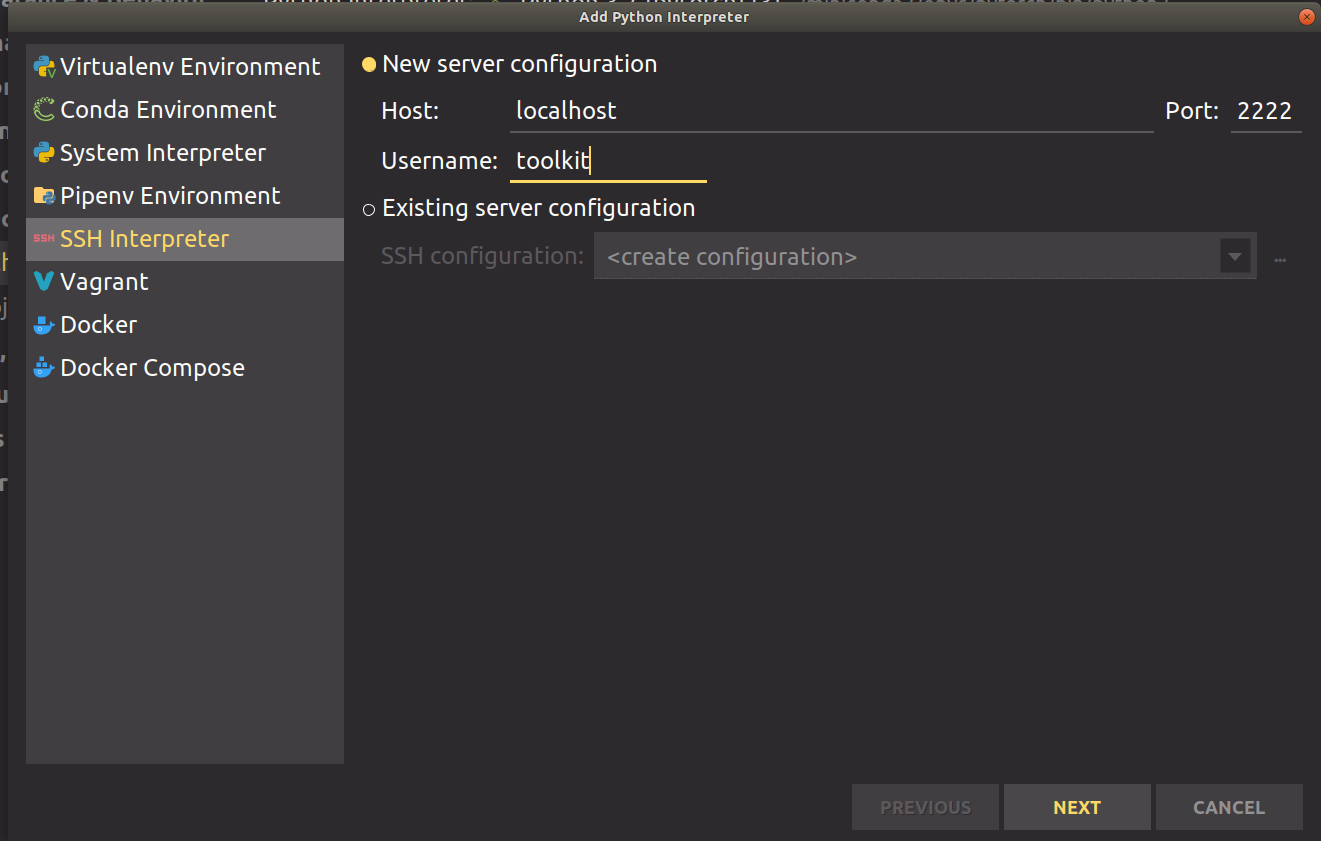
Change the location of the interpreter according to your environment. For example, Conda is at /opt/conda/bin/python.
Click Finish.
You’re all set! We can now run a script from Pycharm hello-world.py that will run in the job.
import os

print("Working dir: ", os.getcwd())
# We can import pytorch now!
import torch

print('Torch random', torch.ones([1, 3, 3]).shape)
print("Torch lib location", torch.__file__)
Running this script will output:
ssh://toolkit@localhost:2222/opt/conda/bin/python -u /tmp/pycharm_project_480/hello-world.py
Working dir:  /tmp/pycharm_project_480
Torch random torch.Size([1, 3, 3])
You can also set breakpoints and inspect variables.
On the right panel, you should see files getting synced:

How to Run VisualStudio Code
The following commands are performed by the acme.joe user.
First, let’s create a data to hold vscode settings:
$ eai data new vscode
Then, assuming you want to edit code that lives in acme.job.sample data, simply submit a job with the following:
$ eai job submit --image codercom/code-server:v2 \
    --data acme.joe.vscode:/home/coder/.local/share/code-server \
    --data acme.job.sample:/home/coder/project \
    code-server -- --host 0.0.0.0 --auth none
id                                   state   name created              command                                  runs.exitCode
5c5bce9b-4657-4836-89d9-01ec780f57db QUEUING      2019-12-06T20:49:41Z [code-server --host 0.0.0.0 --auth none] -
$ eai job logs -f
info  Server listening on http://0.0.0.0:8080
info    - No authentication
info    - Not serving HTTPS
Once running, use the job ID to connect yourself to the web interface using your browser. For example: