Permissions
Toolkit permissions are fairly complex. It’s best to start with reading the Entities and Policy Taxonomy sections. Then you can either read on with the Policies Explained, if you prefer formal documentation, or move to Permission Scenario if you prefer learning through examples. You can also view the Tips section at the end of the page.
You can view all the actions used by Toolkit on the Permissions table.
Entities
Type |
Description |
|---|---|
Organization |
The top-level concept that pertains to permissions. The root of every Toolkit entity is an organization. By
default, ServiceNow automatically get a user created under the |
User |
An entity, uniquely identified via an email, that can authenticate in the system via various authentication methods including email/password, single sign-on and tokens. In Toolkit, aside from default permissions on user creation, permissions are provided via the concept of roles. |
Account |
The children entities of organizations. They can be subspaced. Their children are roles. Subspaced accounts, data, jobs and registries are tied to accounts. |
Role |
Live under accounts. They associate users to policies. |
Team |
A group of users or teams |
Policy |
A rule that gives rights over Toolkit resources. |
Data |
A Toolkit data storage. |
Job |
A task running inside Toolkit. |
Excluding policy, these concepts are resource types on which Toolkit policies can be applied.
All those entities have a matching CLI command.
Policy Taxonomy
- Policy:
<action>@<resource>. action:
(<action type>:<action verb>)|*A wildcard means all permissions on all resource types.action type:
user|account|role|policy|data|job|registry|*The wildcard means all of them.- action verb:
get|set|new|*. The wildcard means all of them. get: See permission.
set: Update permission. In many situations, having a “set” permission alone is insufficient, to perform an update. Hence, the “get” permissions may be needed.
new: Create permission.
- action verb:
resource:
<resource fullName>or<resource id>. It is possible to use wildcards.<resource fullName>:*or<resource id>:*. Eg.: It means all the resources under the provided resource ID or fullName.Note
Legacy way: The previous way to write policy by using an expression based on the URN is still supported and is
<organization id>:<resource type>:<resource id>[:<resource type>:<resource id>]It is possible to use wildcards. Eg.:organizationID:account:accountID:*means all resources under the account accountID.organizationID:*means all entities under the organizationID.
- Policy:
The taxonomy described here is the one supported by Toolkit. Policies are very liberal and it is possible
to create policies unrelated to that taxonomy, as long as they are more or less of the form <left>@<right>.
For instance, the following policy can be created but would have no inherent impact on Toolkit: potato@kitchen.
However, user developped applications can look it up and take decisions based on it.
Note
There is no delete action. Toolkit resources are permanent.
Policies Explained
All Toolkit entities live in a hierarchy. At the top lives the organization concept. This one is only manageable by Toolkit administrators. Under organization live users and accounts. Under accounts live more accounts, roles, jobs, and data. Each of these instances live in a single account. Users can have multiple roles. Finally, policies are bound to roles.

Putting it all together, we have users who have roles. Their roles have policies <action>@<resource>. In
plain English, we can say that those users can perform the action on the resource.
Policies are additive. The sum of the policies in the roles in which your user is makes up your permissions.
Expirable Policies
When policies are created, an expiration can be set on them either at a target datetime with the --expiration flag or the --duration flag.
Expired policies are not pruned automatically. They are still listed, but don’t take effect.
Note
All tokens created on Toolkit have an enforced maximum expiration of 90 days.
Accounts, Roles and Policies
When an account is created, it automatically comes up with roles:
admin: All the members of this role will be granted all permissions on the account. They can also manage the permission in the account.
user: All the members will be granted a full usage of the registry, job and data.
readonly: All the members will be granted a read-only access to the registry, job and data.
job_access: All the members will be granted a HTTP access to all the jobs.
The creator is automatically added to the admin role and has all permissions on the account and its sub resources. Those permissions are shareable by default. Example.:
$ eai role policy ls snow.demo.admin

id                                   source target          action resource  cascades shareable expiration
599754be-4fd4-450c-a881-30d3fbc3a502 direct snow.demo.admin *      snow.demo false    true      -
11441ca2-b2ae-42be-ae84-1b2d0ad7b177 direct snow.demo.admin *      snow.demo true     true      -
Note
To have the legacy output with the full expression, you can use the flag --fields id,target,action,expression,shareable,expiration:
$ eai role policy ls snow.demo.admin --fields id,target,action,expression,shareable,expiration

id                                   target          action expression                                                                          shareable expiration
599754be-4fd4-450c-a881-30d3fbc3a502 snow.demo.admin *      c48991c7-3d5b-4c93-9459-5f311a28da4f:account:cf57017d-0943-43df-aff6-73770fdccc73   true      -
11441ca2-b2ae-42be-ae84-1b2d0ad7b177 snow.demo.admin *      c48991c7-3d5b-4c93-9459-5f311a28da4f:account:cf57017d-0943-43df-aff6-73770fdccc73:* true      -
We see that this role gives all permissions, as denoted by the * under action on the account itself (the 1st line) and
all resources under it (the 2nd line, cascades = true or the expression ending with :*).
No users are added to the other roles. It’s automatically created for convenience. Those permissions are not shareable by default. Here is an example of its default policies:
$ eai role policy ls snow.demo.user

id                                   source target         action        resource  cascades shareable expiration
ecdc2f5e-09c7-473b-ac98-889f89f824db direct snow.demo.user *:get         snow.demo false    false     -
a3680ad2-8095-4356-84f1-caf60817cadc direct snow.demo.user *:get         snow.demo true     false     -
81052c36-2dd6-4713-909a-bf87b6cd2af7 direct snow.demo.user data:new      snow.demo false    false     -
ecd5dbe8-05ad-459f-830e-d6f3d4a9f61f direct snow.demo.user job:new       snow.demo false    false     -
88eae293-020d-465c-8a21-2a9bf43d918c direct snow.demo.user registry:pull snow.demo false    false     -
b121b1a5-2bf9-4ed3-9693-fc6a62c24f88 direct snow.demo.user registry:push snow.demo false    false     -
f0c5fc52-34e7-4e77-827a-f947b8f035a4 direct snow.demo.user data:*        snow.demo true     false     -
6368e2e1-f389-4433-a8ba-a62c740bea2b direct snow.demo.user job:*         snow.demo true     false     -
Note
To have the legacy output with the full expression, you can use the flag --fields id,target,action,expression,shareable,expiration:
$ eai role policy ls snow.demo.user --fields id,target,action,expression,shareable,expiration

id                                   target         action        expression                                                                          shareable expiration
ecdc2f5e-09c7-473b-ac98-889f89f824db snow.demo.user *:get         c48991c7-3d5b-4c93-9459-5f311a28da4f:account:cf57017d-0943-43df-aff6-73770fdccc73   false     -
a3680ad2-8095-4356-84f1-caf60817cadc snow.demo.user *:get         c48991c7-3d5b-4c93-9459-5f311a28da4f:account:cf57017d-0943-43df-aff6-73770fdccc73:* false     -
81052c36-2dd6-4713-909a-bf87b6cd2af7 snow.demo.user data:new      c48991c7-3d5b-4c93-9459-5f311a28da4f:account:cf57017d-0943-43df-aff6-73770fdccc73   false     -
ecd5dbe8-05ad-459f-830e-d6f3d4a9f61f snow.demo.user job:new       c48991c7-3d5b-4c93-9459-5f311a28da4f:account:cf57017d-0943-43df-aff6-73770fdccc73   false     -
88eae293-020d-465c-8a21-2a9bf43d918c snow.demo.user registry:pull c48991c7-3d5b-4c93-9459-5f311a28da4f:account:cf57017d-0943-43df-aff6-73770fdccc73   false     -
b121b1a5-2bf9-4ed3-9693-fc6a62c24f88 snow.demo.user registry:push c48991c7-3d5b-4c93-9459-5f311a28da4f:account:cf57017d-0943-43df-aff6-73770fdccc73   false     -
f0c5fc52-34e7-4e77-827a-f947b8f035a4 snow.demo.user data:*        c48991c7-3d5b-4c93-9459-5f311a28da4f:account:cf57017d-0943-43df-aff6-73770fdccc73:* false     -
6368e2e1-f389-4433-a8ba-a62c740bea2b snow.demo.user job:*         c48991c7-3d5b-4c93-9459-5f311a28da4f:account:cf57017d-0943-43df-aff6-73770fdccc73:* false     -
We see that this role gives get permissions, as denoted by the *:get under action on the account itself (the 1st line) and
all resources under it (the 2nd line, cascades = true or the expression ending with :*).
Other policies are granting the permission to manage registry, data and, job.
Default policies of each user
Default policies are created when users are added to organizations.
The
user:setpolicy is created, having both the user as the source and target, allowing the user to set the associated name.Multiple policies are created to allow the user to use their
homedata.
$ eai user policy ls
id                                   source target               action     resource                  cascades shareable expiration
1b14b003-5986-410a-afe5-856639ec4c14 direct snow.guillaume_smaha user:set   snow.guillaume_smaha      false    false     -
be113ba2-93a8-44a8-b297-e16d8b87b3f7 direct snow.guillaume_smaha data:get   snow.home.guillaume_smaha false    false     -
be113ba2-93a8-44a8-b297-e16d8b87b3f7 direct snow.guillaume_smaha data:read  snow.home.guillaume_smaha false    false     -
d5091fec-aa57-4faf-9d50-5e411c18e8f0 direct snow.guillaume_smaha data:write snow.home.guillaume_smaha false    false     -

# Legacy output:
% eai user policy ls --fields id,target,action,expression,shareable,expiration
id                                   target               action     expression                                                                                                                  shareable expiration
1b14b003-5986-410a-afe5-856639ec4c14 snow.guillaume_smaha user:set   c48991c7-3d5b-4c93-9459-5f311a28da4f:user:e44ce0fe-446d-4838-946b-9a61f886297b                                              false     -
d5091fec-aa57-4faf-9d50-5e411c18e8f0 snow.guillaume_smaha data:get   c48991c7-3d5b-4c93-9459-5f311a28da4f:account:3f0905b0-516c-4ac5-8b1f-f606770fc1cb:data:fe731f85-5d20-4bcf-986d-f458180b5000 false     -
be113ba2-93a8-44a8-b297-e16d8b87b3f7 snow.guillaume_smaha data:read  c48991c7-3d5b-4c93-9459-5f311a28da4f:account:3f0905b0-516c-4ac5-8b1f-f606770fc1cb:data:fe731f85-5d20-4bcf-986d-f458180b5000 false     -
be113ba2-93a8-44a8-b297-e16d8b87b3f7 snow.guillaume_smaha data:write c48991c7-3d5b-4c93-9459-5f311a28da4f:account:3f0905b0-516c-4ac5-8b1f-f606770fc1cb:data:fe731f85-5d20-4bcf-986d-f458180b5000 false     -
Default Policies of the snow Organization
Warning
This is about users joining the snow organization. Users joining other organizations may get different policies.
The user is added to the snow.user role. This gives the permission to get the organization, and see the user, team and, roles in the organization.
Example:
$ eai role policy ls snow.user
id                                   source target    action       resource cascades shareable expiration
fb6bc998-2f3e-4cc7-85cf-8b7001426ab0 direct snow.user *:get        snow     false    true      -
c1695e72-2297-430a-8952-be442c0db2fd direct snow.user user:get     snow     true     true      -
2e2a296c-39aa-4a77-85f0-5f785d8defb1 direct snow.user user:add     snow     true     false     -
2e2a296c-39aa-4a77-85f0-5f785d8defb1 direct snow.user user:rm     snow     true     false     -
58453d57-8cba-42e4-ba60-18e02961e3be direct snow.user role:get     snow     true     true      -
c20d94a8-99e1-4245-8664-2ff13f701915 direct snow.user team:get     snow     true     true      -
Example to add new policy
To make the commands simpler, IDs are represented as ${<TYPE>_ID}.
1. Allowing a Role to Connect to A Job
eai role policy new snow.account_a.role_r job:get+job:access@snow.account_a.job_a
# Or
eai role policy new snow.account_a.role_r job:get+job:access@${JOB_ID}

# Legacy way:
eai role policy new snow.account_a.role_r job:get+job:access@${ORG_ID}:account:${ACCOUNT_ID}:job:${JOB_ID}
# or
eai role policy new snow.account_a.role_r job:get+job:access@$(eai job get ${JOB_ID} --field urn)
Users in the snow.account_a.role_r can connect (job:get and job:access action) to the job
${JOB_ID}.
Hint
Only the format @fullName will be used in the following example
2. Allowing a Role to Pull Docker Images from a Registry
eai role policy new snow.account_a.role_r registry:pull@snow.account_b
3. Allowing a Role to Read from a Data
eai role policy new snow.account_a.role_r data:get+data:read@snow.account_b.data_d
Policy Scope
Policy scope defines where a shareable policy is allowed to apply. It acts as a boundary that prevents permissions from being shared beyond their intended organization, account, or role.
Why Policy Scope Matters
Without scope, a shareable policy could be reused in unintended places. Policy scope exists to:
Prevent permission leakage across accounts or organizations
Ensure access is granted only within intended ownership boundaries
Allow safe reuse of shareable policies
Enforce clear and auditable access control
In short: Scope controls how far a shareable policy can travel.
When Scope Is Enforced
Policy scope is enforced only for shareable policies.
Non-shareable policies are always limited to their direct target
Shareable policies must respect their defined scope when reused
If a policy is shared outside its scope, the operation is rejected.
Supported Scope Types
A policy scope must reference one of the following resource types:
OrganizationAccountRole""(global)
Other resource types are not valid scope boundaries.
Scope Behavior by Resource
Organization scope:
Policy may be shared anywhere within the organization
Includes all accounts, roles, teams, and users under the organization
Account scope:
Policy may be shared only within the specified account
Includes sub-accounts and their roles
Role scope:
Policy may be shared only within a specific role hierarchy
Provides the strictest level of isolation
Global scope:
An empty string
""is considered global scopePolicy may be shared across all organizations
Use with extreme caution, as it grants permissions universally
How Scope Affects Sharing
When sharing a policy, both conditions must be satisfied:
The target resource must be within the policy’s scope
Any provided scope during sharing must also fall within the policy’s scope
If either condition fails, policy creation or sharing is denied.
Creating a Scoped Policy
Use the --scope flag when creating a shareable policy.
CLI Usage
eai role policy new <parent> <statement> --shareable --scope <scopeResource>
eai role policy new org.acc.role "job:get@org.acc" --shareable --scope org.acc
Policy Sharing Examples
The following table illustrates how policy scope affects sharing.
To share a policy, a user must already possess shareable policies and target, incoming scope of the new policy should be within that user’s existing shareable policy scopes.
User’s Existing Shareable Scope(s) |
Incoming Sharing Target |
Incoming Scope |
Allowed? |
Reason |
|---|---|---|---|---|
|
|
|
Yes |
The existing shareable scope is |
|
|
|
Yes |
Both target and incoming scope are covered by the existing shareable scope |
|
|
|
Yes |
Both target and incoming scope are covered by the existing shareable scope |
|
|
|
No |
Incoming scope is not covered by the existing shareable scope |
|
|
|
No |
Both target and incoming scope are not covered by the existing shareable scope |
|
|
|
No |
Incoming scope is not covered by the existing shareable scope |
|
|
|
No |
Both target and incoming scope are not covered by any of the existing shareable scopes. |
Note
When a user does not explicitly set a scope during policy creation or sharing, an empty string "" (global scope) is assigned.
Best Practices
Always define a scope for shareable policies
Prefer account-level scopes over organization-level scopes
Use role-level scopes only when strict isolation is required
Permission Scenario
The following series of scenarios will illustrate some of the most fundamental concepts behind the Toolkit.
We will start with the addition of a new organization to the toolkit, and make our way step by step to project
shared by multiple user profiles who each have different levels of permission accesses.
Step 0: Request an account for your team project
If your team doesn’t have an account, you can ask on Toolkit support for a new account.
If your team already has an account, you can access it by asking the admin of the account to run:
eai account role member add snow.account_a.user <yourMail>
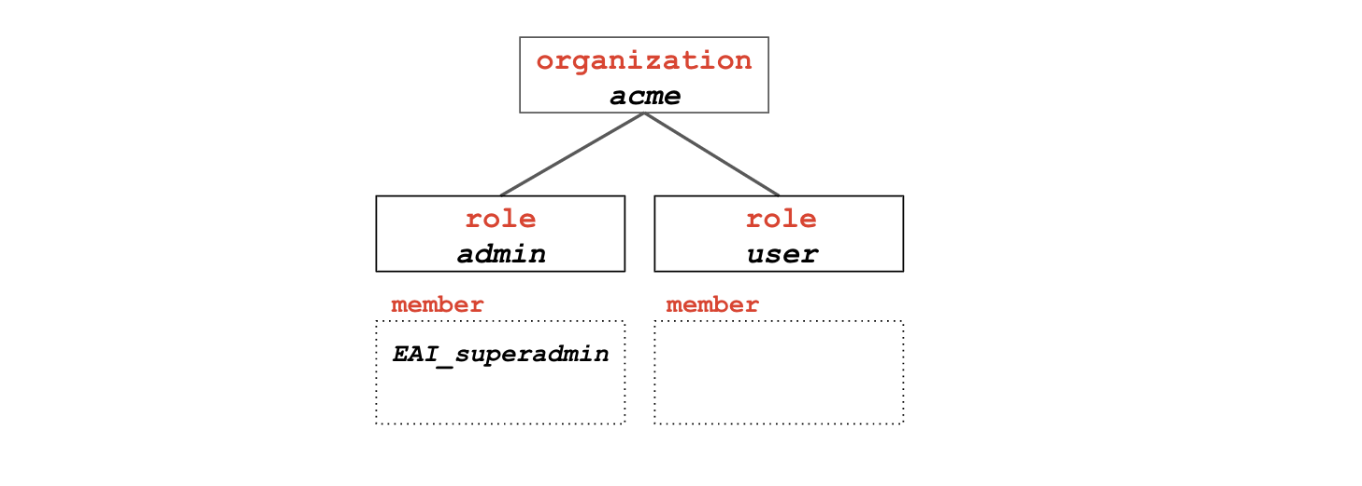
Step 0: A new organization is created
This step can only be taken by a Toolkit superadmin. It creates the root object for your organization.
It will also create two children roles under the organization:
roleadminroleuser
The Tookit superadmin is automatically assigned to the role admin for the new organization. This is transferable
later on to the administrator in the organization. When a user is assigned a role, we say that the user
becomes a member of that role.
Step 1: A first user is added to the organization
A user is a resource that can be added as a child to an organization or as a member
to a team (more on teams later). Only users with the role of admin on the organization
can invite new users. In our scenario, since the EAI_superadmin is still the only administrator for
the acme organization, he or she will have to invite a new user from that organization.
This is done with the eai user invite command. To add a new user to an organization,
all that is needed is an email address.
eai user invite <mail@domain> --organization <organization>
Adding a user to the organization results in a few things happening:
The
useris added as a child to theorganizationand as amemberof theuserrole for thatorganization. Or it can be renamed thereafter with the command$ eai user set <user id> --name <new name>The
userwill not have any account associated to him, it will need to be granted access to an account project and then it will be possible to define it as his default account:$ eai user set --account <project account>
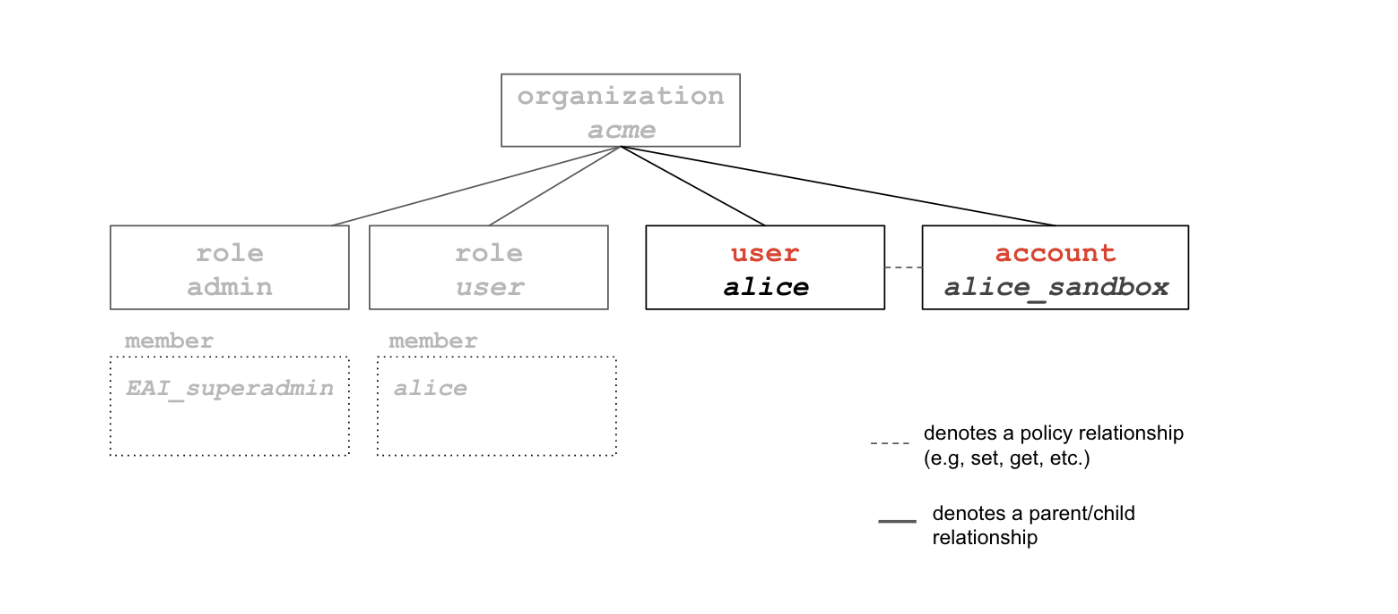
For the purpose of our scenario, we have added the user alice and she was added to a project account named
alice_sandbox. Everything is ready for Alice to start using the toolkit, except that she hasn’t
logged in yet… Let’s have her login.
Step 2: Starting new project(s)
Alice is now ready to start setting up new projects. On the toolkit, the concepts of “project” and “account” are completely interchangeable. The terminology account was chosen to make it explicit that the use of resources on the toolkit (jobs, services, data, etc.) will be recorded by account.
Alice is about to kick off work on two separate projects, one is for a publication and another one is a proof-of-concept (POC) for a client. She opts to create two new accounts under her account sandbox_account.
eai account new acme.alice_sandbox.publication
eai account new acme.alice_sandbox.poc
Note that objects on the toolkit can be referenced by their 36-character UUID or by the name they have been assigned.
To reference an object by its name, one must list all of its parents all the way up to the root.
For instance, the reference for the admin role for the publication account below is acme.alice_sandbox.publication.admin
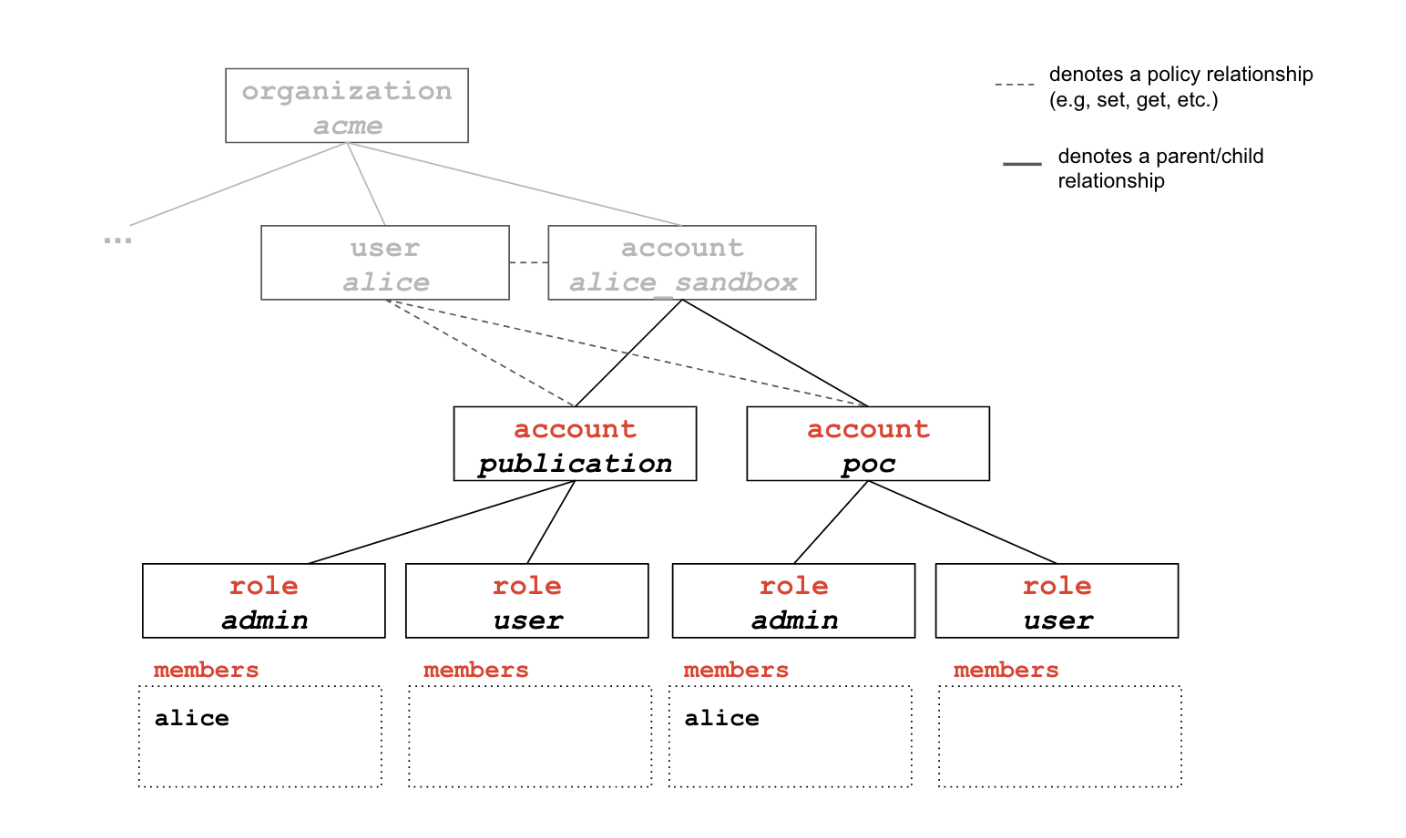
When an account is created, the four standard children roles are also created (admin, user, job_access, readonly) and the account creator is added as a member of the admin role. In our case, Alice is therefore added as an admin on both new accounts.
Alice can now start working with these accounts. She can:
Upload docker images to her accounts (
$ eai docker -h)Upload data (
$ eai data -h)Run jobs (
$ eai job -h)and a lot more.
For most commands, she can specify under which account she
is launching the operation. If the flag is not specified, it will take her sandbox account as default.
Note
Accounts can be subspaced. In the current scenario, acme.alice_sandbox, acme.alice_sandbox.publication
acme.alice_sandbox.poc are all valid accounts.
For the time being, we will assume Alice knows how to perform all these operations and will move on to how to set up an account that is to be shared with other users.
Step 3: Add another user as a collaborator user on an account
For this step, let’s assume that Bob has been added as a new user to the organization.
The organization now holds two users: Alice and Bob. Alice would really like some of Bob’s help with the experiments she is running for her paper publication.
She decides to give Bob access to the acme.alice_sandbox.publication account. For that, she will need Bob’s user UUID (Bob can run $ eai user get), or the name he has assigned to his
user object. (Bob can run $ eai user set --name bob).
Alice can add Bob as member of the user role of her account with $ eai role member add acme.alice_sandbox.publication.user --user acme.bob
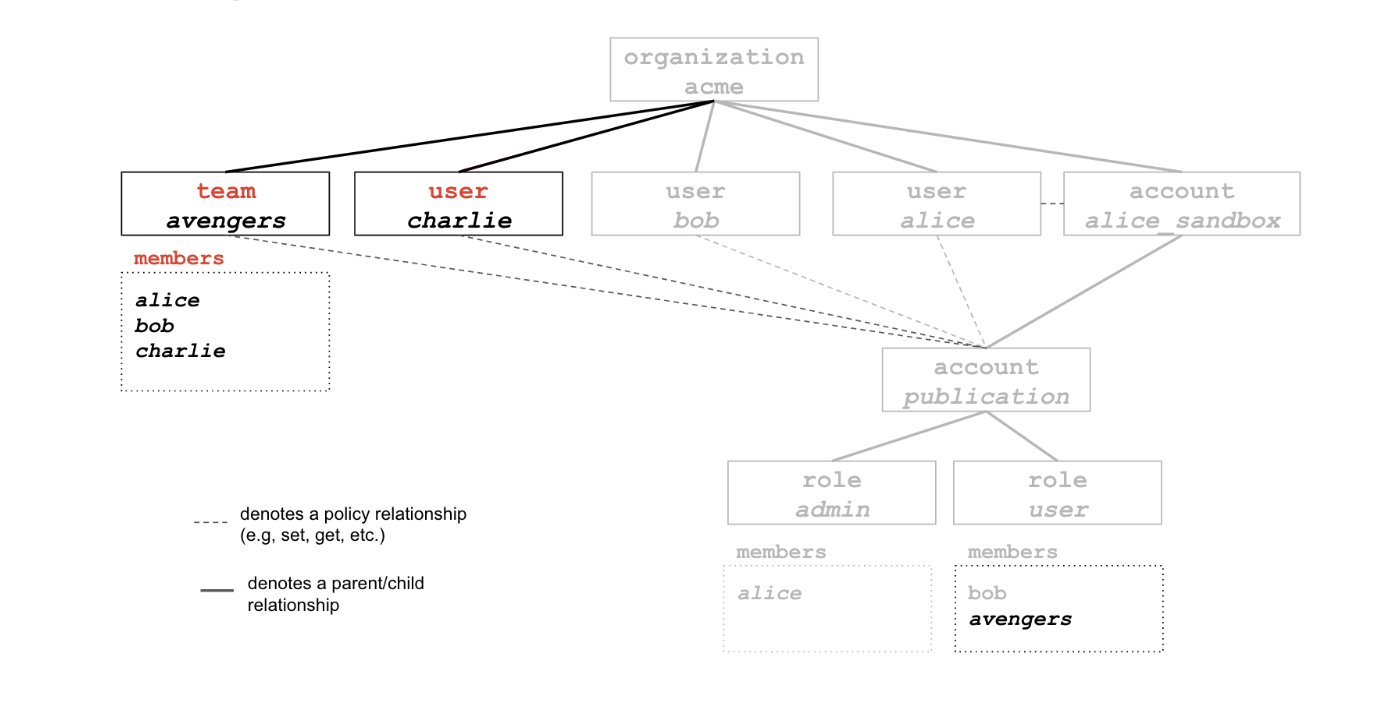
The organization now looks like this (note that some objects such as acme.user and acme.admin are no longer illustrated for simplicity purposes)
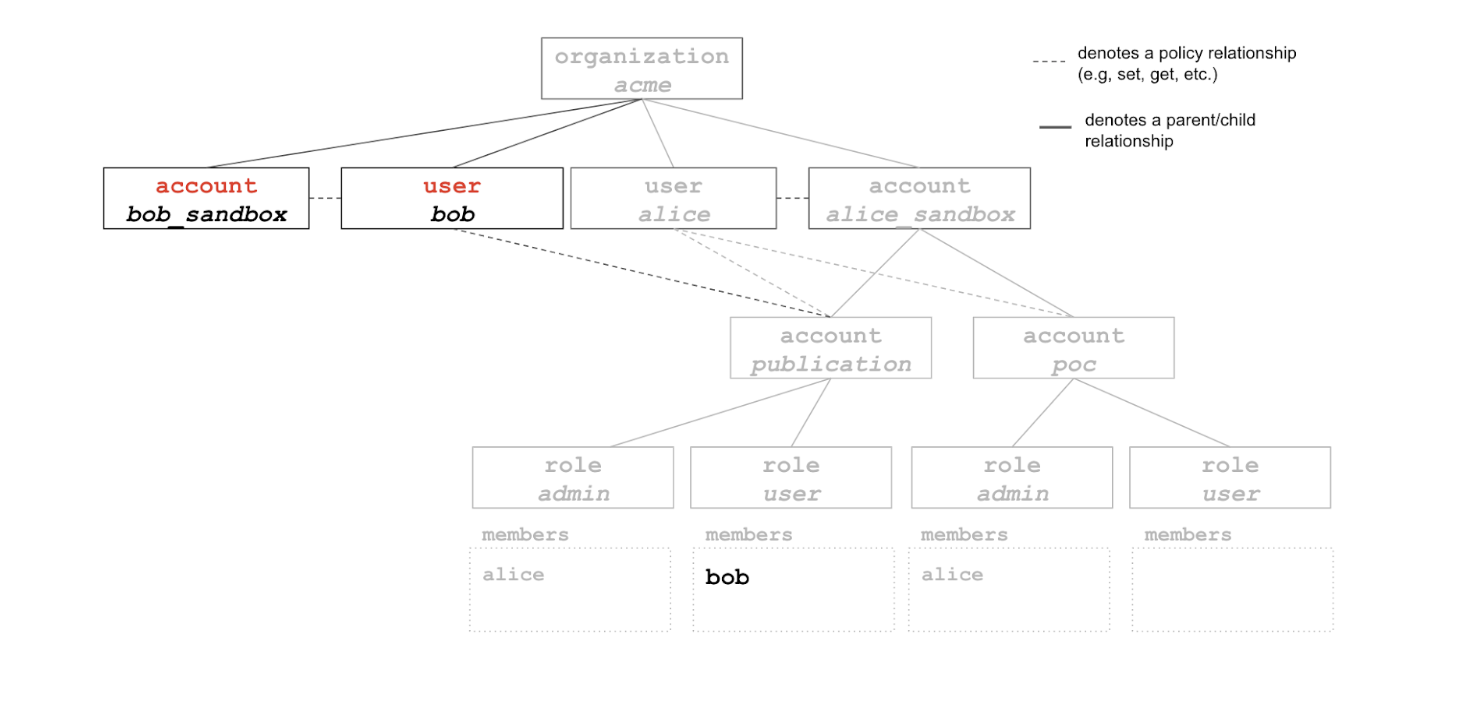
Bob can now perform a number of operations under the account acme.alice_sandbox.publication (e.g, download docker images, download data, etc.). By default, the user role for a new account is given get access to all resources.
The exact set of permissions assigned to Bob for that account is defined by policies associated with the user role.
Step 4: Creating a team
After a few days, Alice realizes that she will need more help than expected with the experimentations for her paper publication.
She decides to add one more user to the acme.alice_sandbox.publication account.
# But this time, she decides to do this through a team, that she is naming avengers.
eai team new acme.avengers

# She adds herself, Bob and Charlie to the team:
eai team member add acme.avengers --user acme.alice --user acme.bob --user acme.charlie

# To check that everyone was added properly to the team, Alice can run:
eai team member ls acme.avengers

# She can then add the team as a member of the user role on the account
eai role member add acme.alice_sandbox.publication.user --team acme.avengers
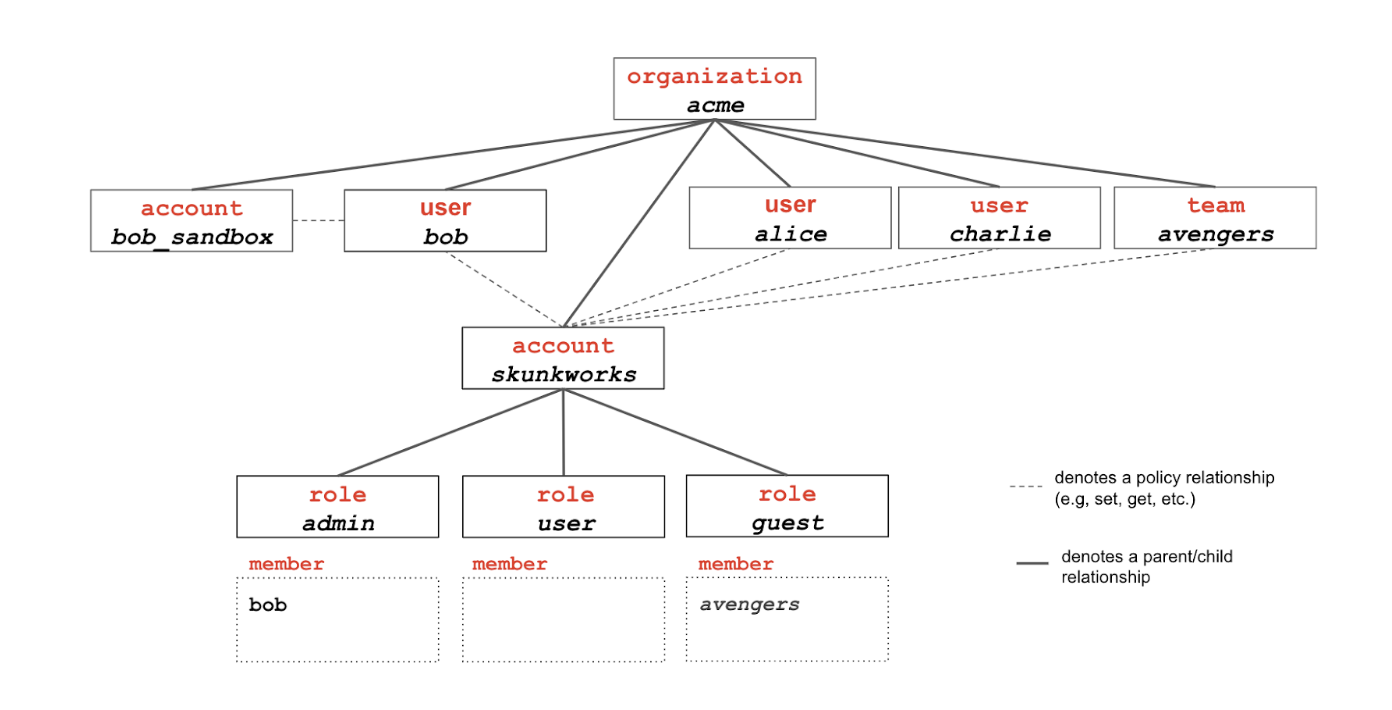
Step 5: Creating a guest role
Bob is also working on projects of his own. For one of these projects, that he has named account skunkworks, he wants to give other users visibility about what he is doing, but he definitely doesn’t want them to use the account to consume resources. He was granted a limited budget by his boss for this account and would hate for someone else to eat into this budget by running jobs…
First, Bob needs to add a new role to the skunkworks account and set get permissions for that guest role. Here, Bob is allowing guests to access information about jobs launched under the skunkworks account and about the data associated to that account as well. Note that set permissions are not provided, which means that guests won’t be able to launch jobs or overwrite any data under the skunkworks account.
ACCOUNT_URN=$(eai account get acme.skunkworks --field urn)
eai role new acme.skunkworks.guest --policy "*:get@${ACCOUNT_URN}:job:*+${ACCOUNT_URN}:data:*"
Note that we use a shell trick here to save the account URN in a variable to reuse it later.
Also, the + and @ sign combination allows for multiple resources expressions (and/or multiple actions) by
applying a cartesian product between the list of actions (on the left of @) and the list of resources (on the right). For example,
--policy a+b@c+d+e is equivalent to --policy a@c --policy a@d --policy a@e --policy b@c
--policy b@d --policy b@e.
Bob can now add members as guests to the account
eai role member add acme.skunkworks.guest --team acme.avengers
Tips
To manage policies tied to a role, run
eai role policy --helpfor more details.To validate rules over resources, you can use
eai rule --help. Consult the How to get an account page to find example usages of that command.The
eai user policy lscommand only lists policies tied to your user account, not all policies tied to all your accounts.